Skills Passport Artefact - Development and outcome
- ehague1
- Feb 4, 2023
- 3 min read
Updated: Apr 16, 2023
For my Skills Passport Artefact, I wanted to adapt the 'lighthouse island' setting from a screenplay I wrote in 2021 (titled: 'SHORELINE').
Key inspirations:
- Late 19th, early 20th Century lighthouse designs
- Irish folklore
- Irish + rural landscapes
- Diorama + dollhouse designs
Skill Goals:
- Creating main base out of wood
- Heavy machinery + Developing craft skills
- Repurposing used materials
- Functional, hinged dollhouse (Able to be added to, rigged with electrics)
- Modelmaking development
Time constraints / potential issues:
- Completely new skills: Diorama creation, woodworking
- Accuracy of scale and period
- Creating an un-obstructive hinge
- Texturing (eg. grass, metal, stone)
I began with three choices for how I could progress:
1) Create a 1:100 diorama of the island and lighthouse, focusing on exteriors
2) create a 1:50 diorama of just the lighthouse exterior
3) create a 1:75 diorama of the lighthouse as a cross-section, able to open outwards with space for individual floors.
I decided to choose option three: I could then focus on an exterior whilst creating an artefact I could use to later develop more skills.
Initial sketches
Reference images
My proposed height would be: 466mm (1:75 of 35m, based on the height of Point Moore, Geraldton, WA (1878)
Development + construction
Rough Technical Drawing
Constructing the base
Materials used: Repurposed wood, block sander, titebond wood glue
Machinery: Circular saw, bandsaw, belt sander
Modelling the lighthouse
I covered the structure in slip, a mixture of smooth and rough watered-down air dry clay. This allowed for texture and naturalistic rock formations across the landscape. I also sanded tge sides of the wood layer in order for a smoother transition for pathways.
I then painted a base coat atop the clay, starting with a watered-down black acrylic mixture to drefine shadows before adding greys and different hues of green.
The entranceway
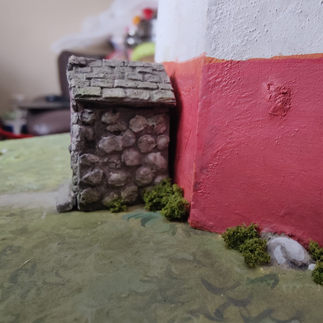
To create the entranceway of the lighthouse, i covered foam board in air-dry clay and uhu glue, before carefully placing individually modelled tiles onto the roof (hand textured to give a weathered effect).
I then began to model various sizes of cobbled stones for the sides of the structure, filling in the internal cavity of the foam with more air dry clay.
The grass: trial and error
I had two approaches to creating a naturalistic grass: One was to use a typical static grass effect by creating my own fibres (with string, scissors and a watered acrylic mix.) The other was to paint the grass in a more stylised fashion.
Detail shots:
Static grass test:


Following my experiments with static grass I concluded that a more stylised approach would work this time, and gained a new skill regardless of whether it was used in the final product.
Model shrubbery
I also used model shrubbery to create bushes and mossy effects across my model, as well as to conceal joins in certain spaces.
Materials used: Air-dry clay, acrylic paint, sandpaper, UHU glue, string, Model shrubbery
Scraping concerns
Due to the movement of wood over my painted grass, I created a barrier using acetate across the section that opened specifically, allowing easy viewing whilst adding longetivity to my design
Final artefact
Overall, I am satisfied with my outcome and with the development of my skills. I have become not only more confident handling power tools and woodworking machinery but also in the execution of my designs and self confidence in my style. I am excited to develop my lighthouse further throughout the summer in preparation for a new addition to my portfolio of electrical skills!
Goals for the future
- Create a wood lasercut light and rail, with a 3D printed or soldered mesh cover.
- Rig model frensel light with electrics (stored beneath the rail itself)
- Technical drawing + modelled internal rooms (individual, able to be pulled out and viewed + stacked)
- Then, I would rig these internal rooms with lights of their own, the switch being next to the frensel light board and concealed in a lasercut shell.


Comments